Repository Settings: Collaboration, Merging, and Pull Requests
Good code is like good science, it’s peer reviewed! We want all of the best ideas, but they must be able to pass the scrutiny (and iterative improvements) of subject experts.
Depending on who you’re sharing with and how you work with them, there are different ways to setup your repository. Below, we go over some key settings and some basic ideas of how to share with git.
Collaboration Styles
There are lots of different models for collaborating with git and many more guides, blogs, and stachexchange threads. For example:
At the H.J. Andrews, however, we mostly use 3 categories:
Collaborating with yourself
Documenting changes, backing up work in the cloud, and recording versions is helpful even if you’re the only one working on a project. You simply clone the repository to a local drive/directory you can access. Make changes, commit them, and push them back to the remote (cloud) repository.
Collaborating with teammates (branch merging)
If you’re working with a small group of people, inevitably, 2 people will commit changes to the same line of code at the same time. Now when you both push your changes to the remote (cloud) repository you’ll need to merge. People with skill and knowledge on a team that talks often can carefully merge the two different changes. Of course, splicing two sets of code together can be complicated. And over time, you might find that some “merge-ers” keeps more of their own code in the repo during merges…
One strategy for dealing with this is setting up branch merging. There are lots of versions of this, but basically, changes are made on development or feature branches, and then merged into master by consensus (see pull requests) or by a repository administrator.
At H.J. Andrews, we mostly try to use this type of repository so that we can increase access to our work, but still moderate changes. Whether you keep the repository private to a select group or let it be public, it’s all about controlling the repository permissions.
Collaborating with everyone
If you want everyone to benefit from your code, and your code to benefit from being tested by lots of people, you should make it public! However, you don’t want anyone to be able to rewrite your code. What if they deleted some function we need to interact with our data loggers! So public facing repositories need to have a more strictly enforced kind of merging.
You could simply protect the master branch, and let people run wild in other branches or use a forking model. To fork a repository a user creates their own copy of the repository in their bitbucket account. They then make as many changes as they want, and they can update their repo with any changes made in our repository. Then, if they want us to add their changes to the original repository, they submit a pull request for our approval.
At H.J. Andrews, we use forking when we have developed a program that is broadly useful and we want the entire community to benefit from our efforts. It’s a very useful way to collaborate. For example: Edge, Firefox, and Chrome web browsers are forks from the public repository for Chromium. All 3 programs pull changes from Chromium to update their foundation but do not merge back what they build on top of that foundation.
Structuring collaboration with permissions
Private repositories
When there is a user group of only 1 or 2 people, simply control user access. Otherwise, we recommend setting up branch permissions.
To keep your repo private go to Repository Settings>>General>>Repository Details and select This is a private repository.
User access
Give Read/Write/Admin access to specific people or user groups. Go to Repository Settings>>General>>User and Group Access.
- Read access only allows cloning and forking. Any changes must be pulled from the fork through a pull request that is approved and merged by someone else.
- Write access - someone can’t be given permission to merge pull requests or commit changes directly to the repository without write access.
- Admin access allows someone to change repository settings and permissions.
Public repositories
If you make a repository public, then you have to set branch permissions. Otherwise some well meaning slob could change all your code! Of course, in git, you can simply revert the repository to a previous point in time!
Branch permissions
Go to Repository Settings>>Branch Permissions. Select Select branch>>By name or pattern. At a minimum, define the
rules for your master branch. You can use wildcard * to apply to any and all branches. If permissions overlap
Bitbucket will always enforce the most restrictive permission entered. So be careful what restrictions you place on
wildcard branches, because they will override any less restrictive permissions on other branches.
For example: if the wildcard * is used, new branches can only be pushed back to the remote by people with write
access to * branches (since all branch names match *). This forces all users not on that list to fork the
repository and make a pull request. Also, if * branches are not allowed to be deleted, then it will all but
eliminate the –fastforward style merge, because a -ff merge automatically deletes the branch being merged.
For forking
Don’t give anyone write access. Everyone has to submit pull requests for review by the group. Anyone can fork the repository and submit a pull request. However, set a core group that can merge by pull request. Only this group can merge the submitted changes into the branch.
If it’s a private repo that only your team can see, you could give everyone permission to merge a pull request. Otherwise, decide on an administrator or team lead for this project who can merge pull requests.
If it’s a public repo then it is important to decide on who will review submissions and approve them. You might want to select a few people so that someone is always free to do the review quickly or you might want to keep the list narrow to the experts in the scope of the project.
For branch merging
You can do branch merging even if it’s a public repository.
Development branches
Give a long list of teammates or team groups write access. If people’s changes should be reviewed first, then give them access to the repository so they can make new branches, but do not give them branch access to write or merge via pull requests. This will require that they make a new branch for their changes adn submit them as a pull request. You can require that default reviewers check their pull request before a merge.
Main/master branches
This should be more restrictive. The master/main branch should be code that is tested, free of bugs, and ready for use; no BETA versions. For collaborative teams you could make merging by pull request only, but give the permission to everyone. Or you may want to identify the project or team leads and administrators who are expected to take the time to double check and debug before passing changes to to main.
Pull Requests
This can be a confusing process if you’re not used to it. I try to step through a little example. The most difficult adjustment for people new to git is that success and improvement are just as visible as mistakes and setbacks. Progress comers from iterative review and critique (scary, right?).
A pull request, is simply a merge between two different branches or forks. But instead of merging right away, it posts the merge on the web as a proposal and lets other people weigh in. Others can look at the changes and submit their own tweaks, or comment, or create a list of tasks that need to be done before the merge can be complete.
Here’s a great guide focused on forking.
So the first thing you need is to change some code and commit those changes to a new branch or a fork.
Then, you share those changes by pushing those changes to a remote (fork/branch) you have access to.
- Now it’s time to make a pull request.
- Go to the repository with your changes. This repository will be sending the changes.
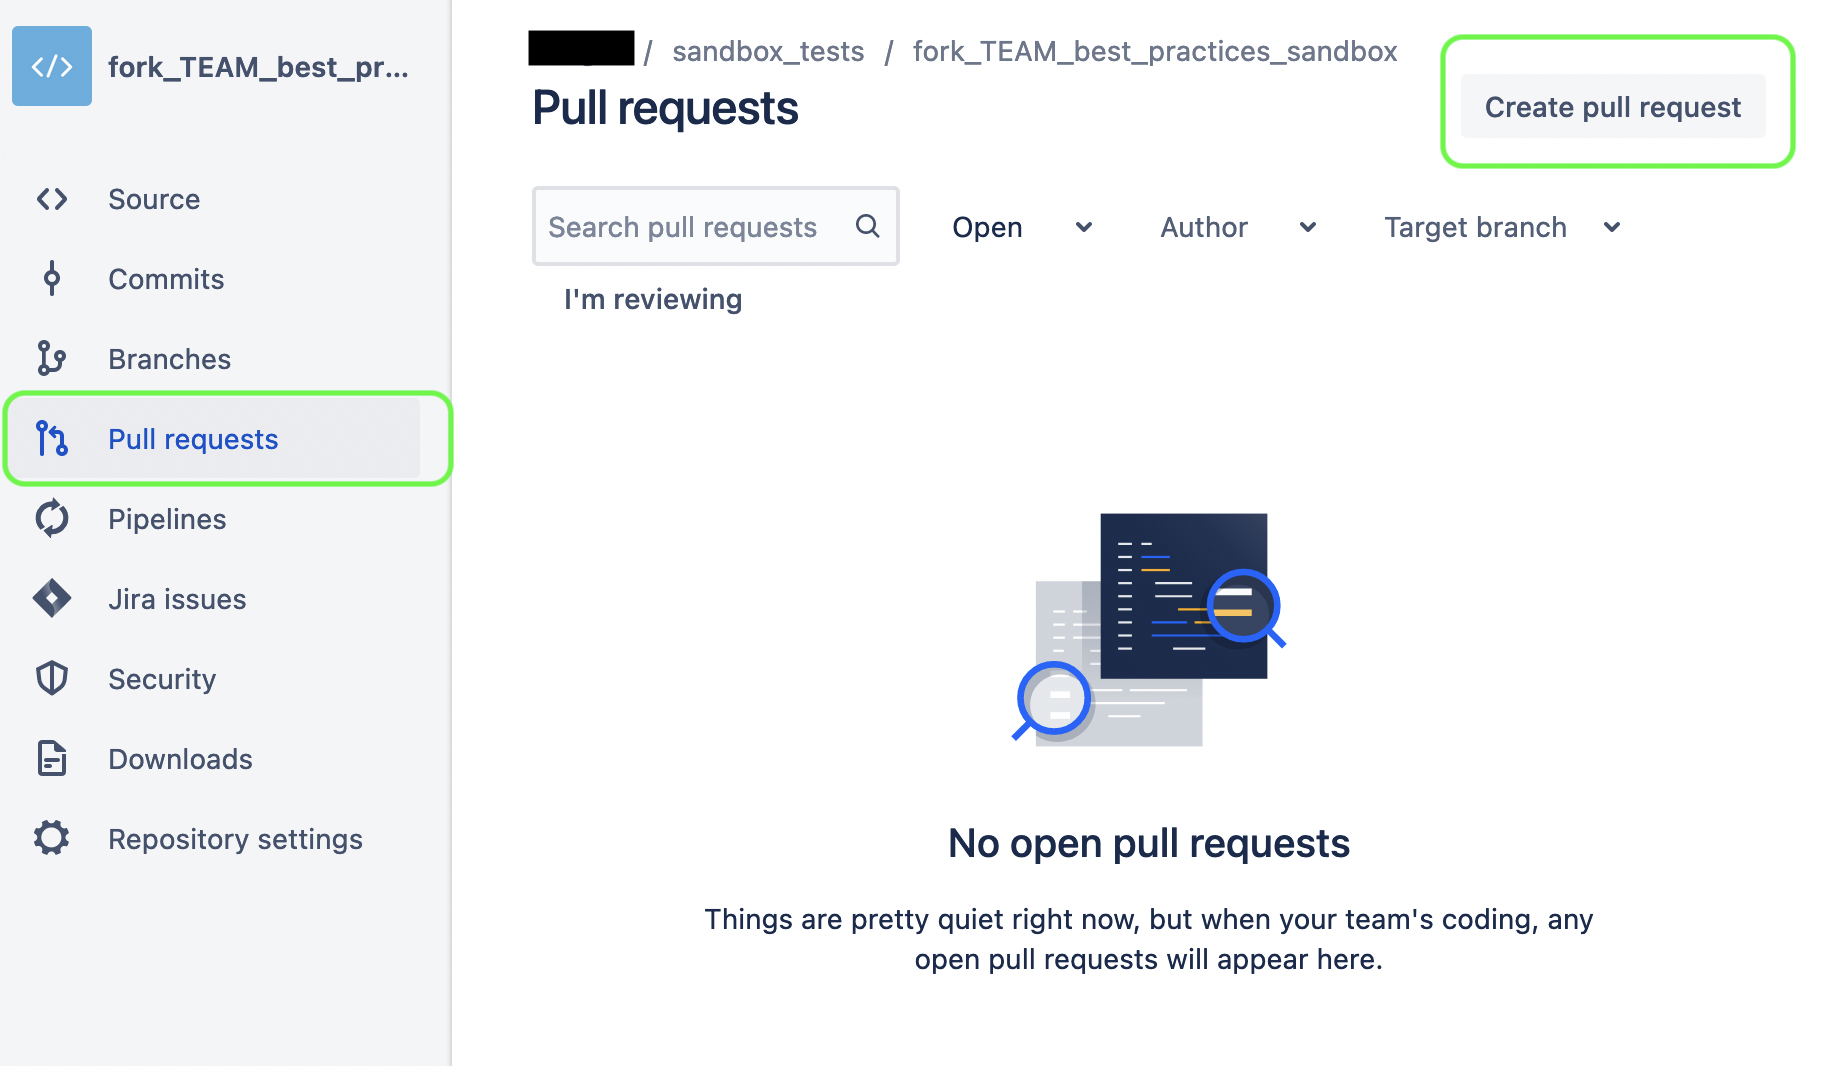
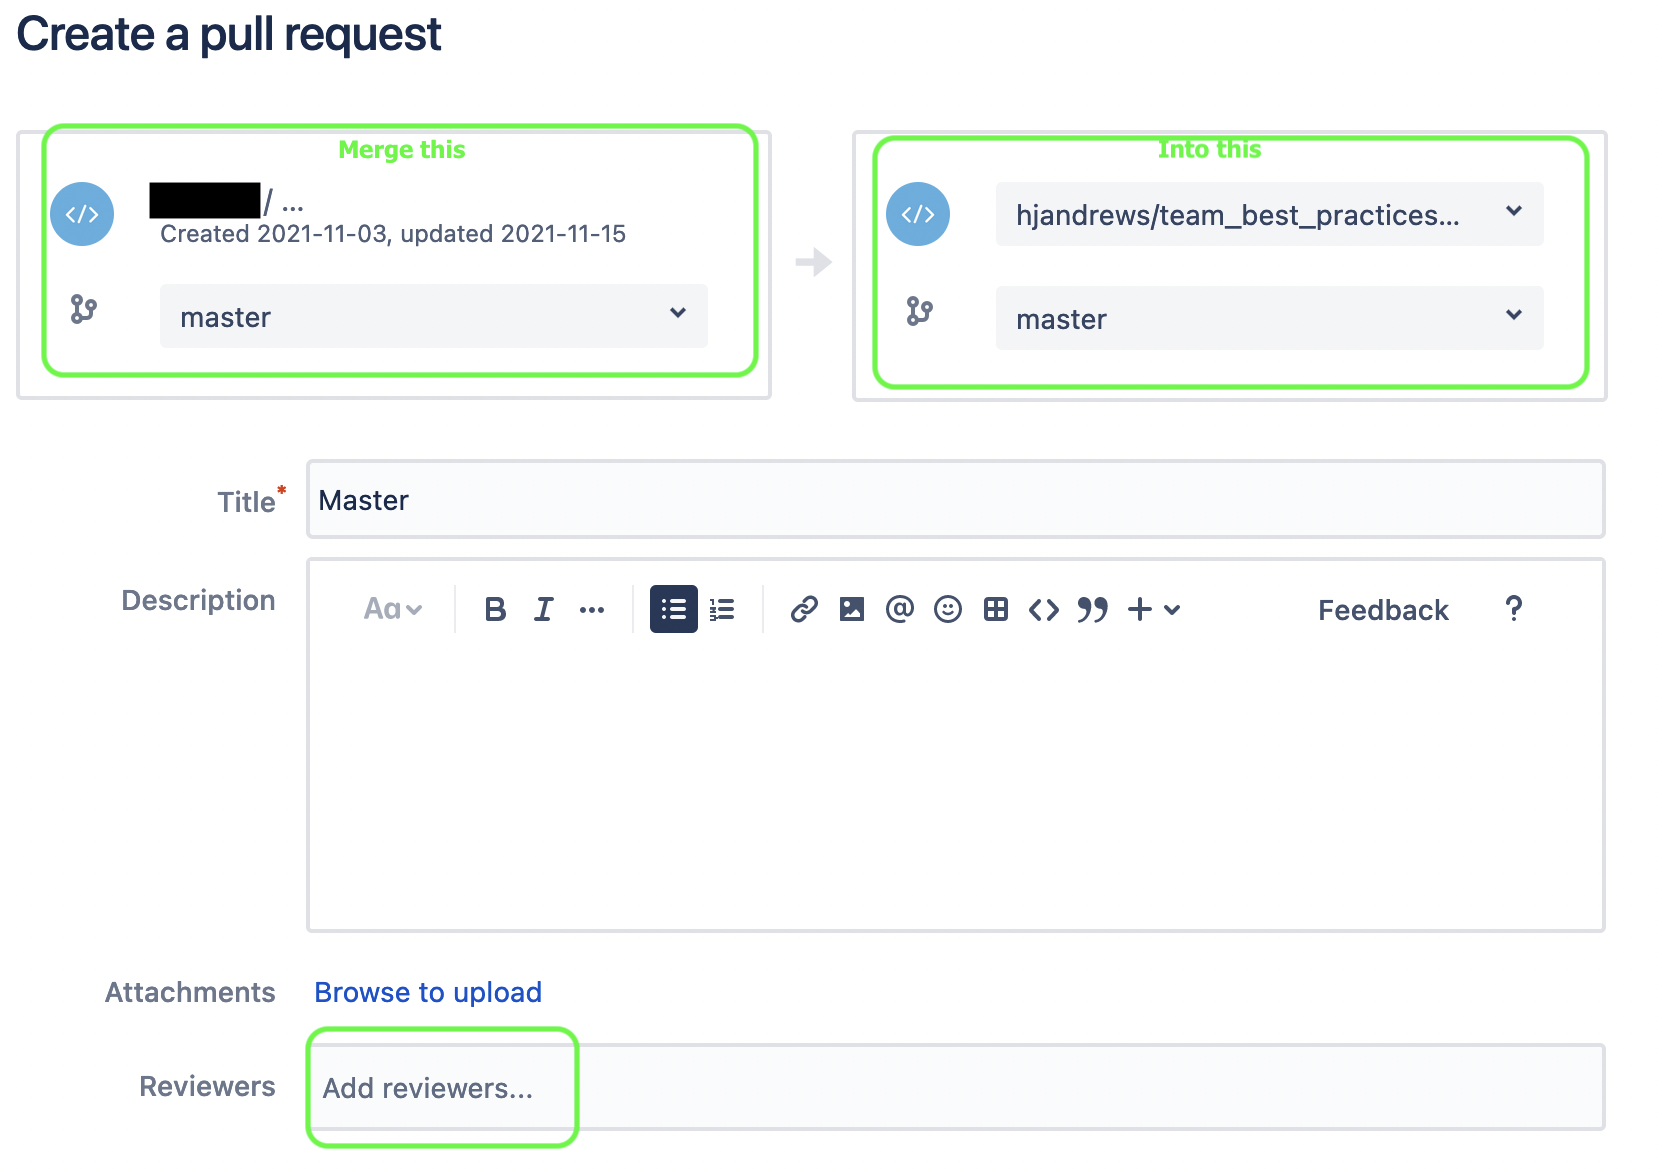
- Select the branch with your changes, and then select the reposiotry and branch to merge into. The drop down lists will restrict you to Heads (branch ends) with a common ancestor. In other words, branches or forks of this repo.
once a pull request is made, a larger group can review the changes. They make comments, create a task list, request changes, and Approve or Decline the request. Any commits made to address comments, requests, or tasks are added to the full request.
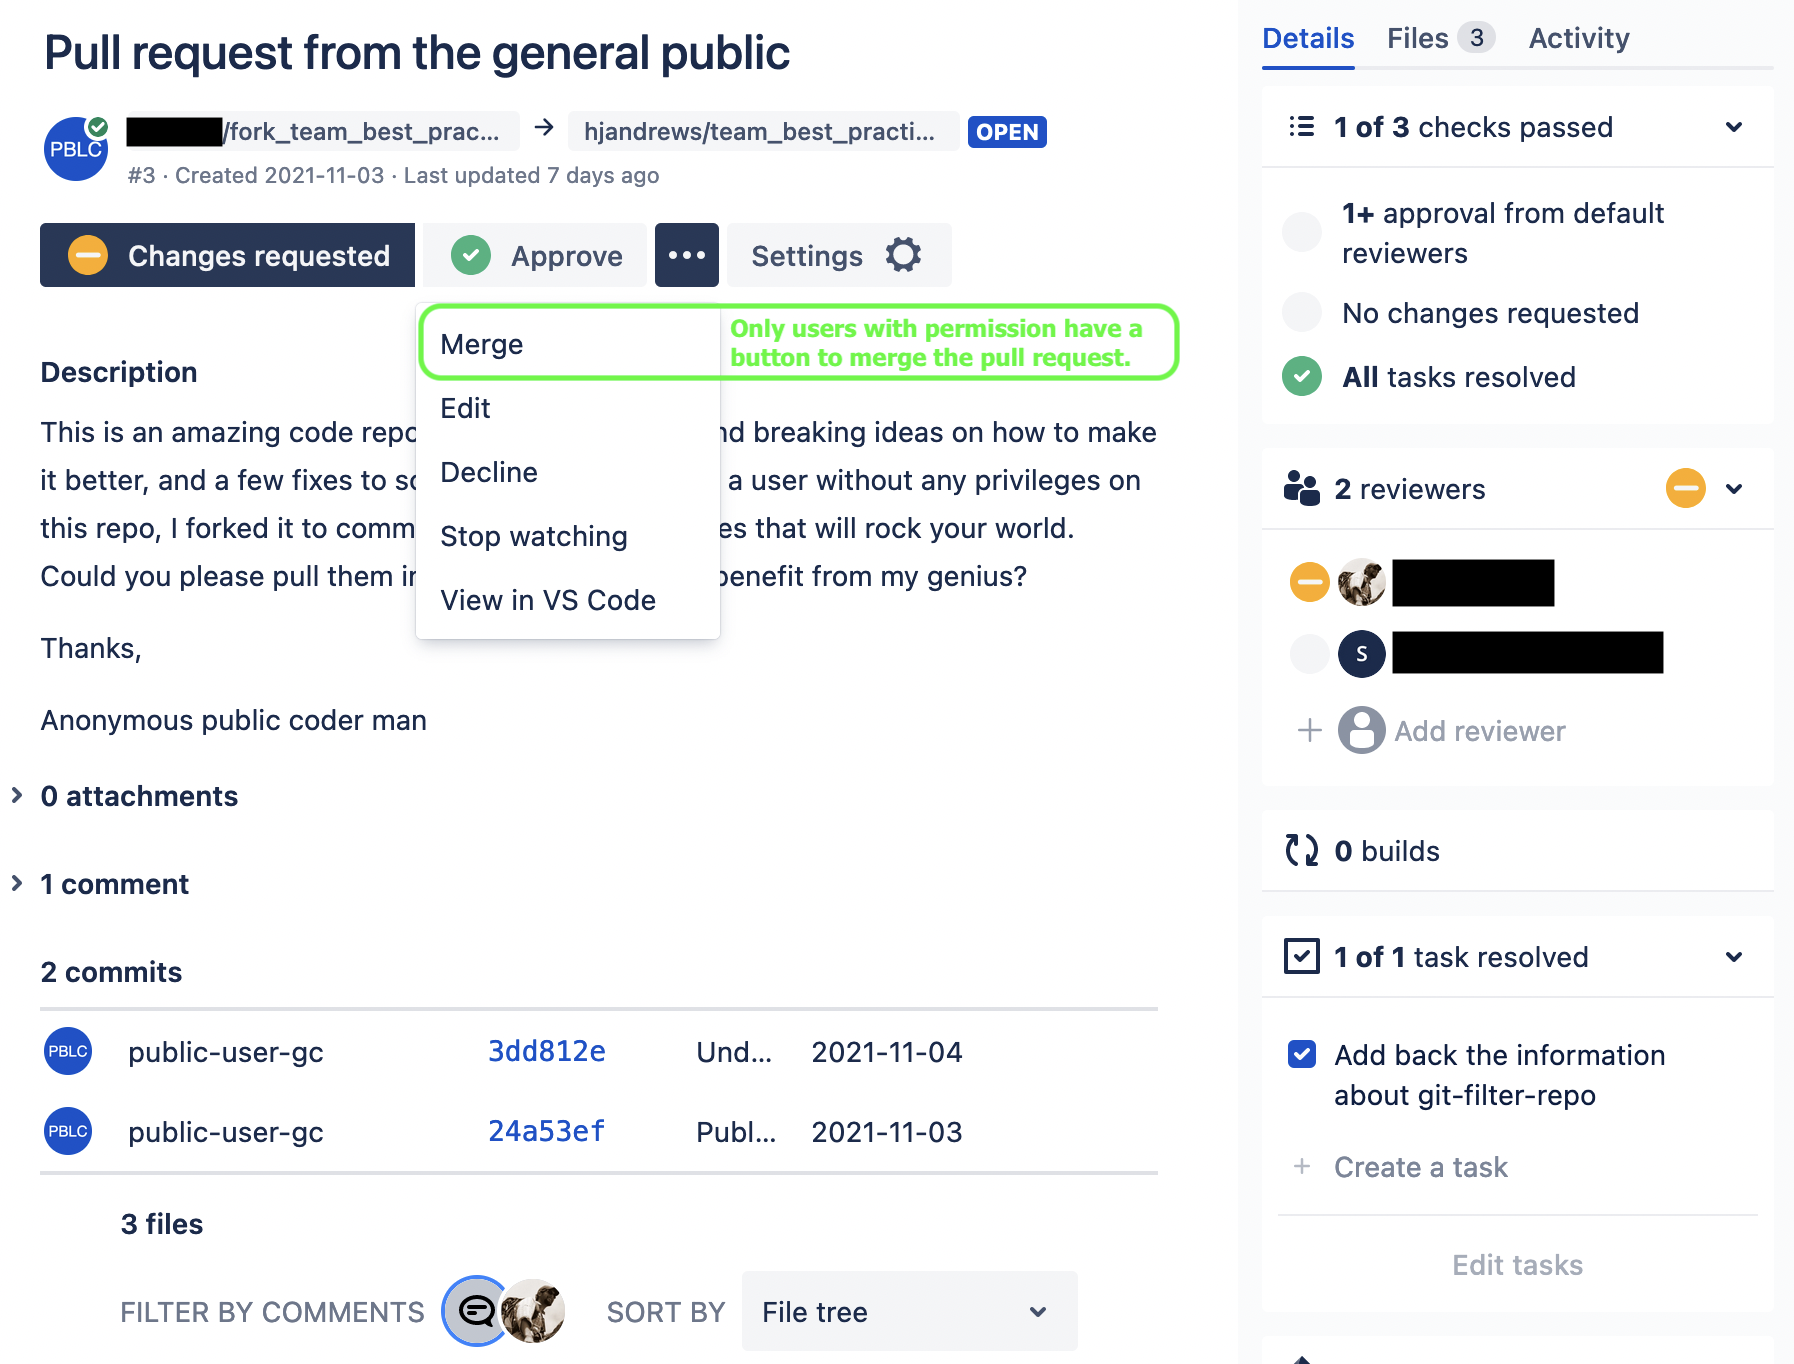
Finally, *someone with permission to merge by pull request can merge the changes* in their final state.